

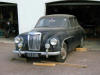
MG Magnette V8
This opens the saga - and a saga it would indeed turn out to be and what was intended to be a 1 or 2 year project has so far consumed 25% of my life! Thousands of photographs, even more hard earned dollars and goodness knows how many hours - many of them turning out to be expensive blind alleys - mean that dear reader, this will eventually extend to well over 30 episodes. Read on...


MAY 24th 2004
Don Bell kindly transported the car home for me and two days later, we flew to the UK for one of our regular trips, so nothing happened for a month or two. I left behind a car that had looked like a reasonable MG saloon, needing either cosmetic work, or a major rebuild.
On our return, I set to dismantling and much to my surprise, dismantling was an extremely unstressed activity and from start to finish, only took about 40 hours to totally strip the bodyshell, remove the running gear and all exterior panels, and strip the doors, ready for the dip strip.
This was informative, especially the make up of the
doors and glass so quite early on, it was obvious that major weight saving was
possible in this area if solutions could be found that were legal and did not
detract too much from the intended use. For example, bearing in mind the
likely minimal use of the rear seats, is a window winding system really
necessary for the rear doors? Front doors are heavy but impact protection or
shock absorption in the event of an accident had to be considered too.
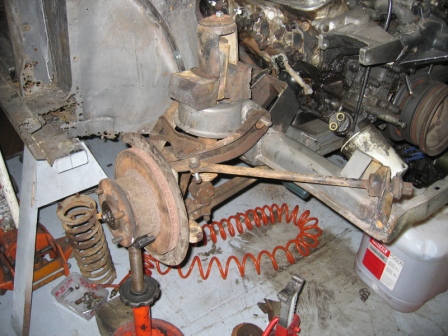
The angle grinder was only used to remove the rear spring shackles, the impact driver for door, boot and bonnet bolts. All other bits and pieces came off using spanners, screw drivers and sockets. Very little was rusted in, though rust and wear on some suspension tie bars was horrific! They just snapped when trying to undo them and most holes had been ovalised - see pic on the right.
November 2004, I really couldn't imagine using paint stripper, so the shell and panels were transported across Auckland, where the whole lot was submerged in some evil liquids to remove nearly 50 years of paint, filler and grease.


Four weeks later I collected a bodyshell and a load of clean panels, sprayed with a thin protective clear coat.

Why bother stripping by hand? I also collected what appeared to be a well worn colander, with some areas having rather more holes than metal. Could this rotten underside ever be restored, or more to the point, had I just bought a pile of rust?

The shell and panels came home for Christmas and clogged up my garage quite comprehensively.
The dismantled pile of bits sat in my garage over Christmas 2004 ready for transportation down to Mal Clark who is well known for building, racing and rallying classic cars and has a real fondness for the Rover V8 engine. His garage usually has several interesting cars being fettled or built, and as a competitor, understands track behaviour and the need for good handling and good brakes.
JANUARY 2005
 The bare shell arrives at By'Gone Autos - note the Mini Marcos in the background...
Now in Christchurch. Getting the shell onto the trailer
without a winch wasn't easy but with the assistance of my wife and a neighbour,
we managed to drag it on. This was a fairly sweet moment as it represented the
first stage in what I expected to be a rapid and radical transformation.
The bare shell arrives at By'Gone Autos - note the Mini Marcos in the background...
Now in Christchurch. Getting the shell onto the trailer
without a winch wasn't easy but with the assistance of my wife and a neighbour,
we managed to drag it on. This was a fairly sweet moment as it represented the
first stage in what I expected to be a rapid and radical transformation.
As the story unfolds, that proved to be only half right... Radical? Yes. Rapid? Definitely not.
The First major job was to butcher the bulkhead and use a dummy V8 engine for location checks and to enable engine and gearbox mounts to be fabricated. This picture shows it to be January 19th so I was excited to see such dramatic and rapid progress.

More metal had to be cut out around the rear of the engine and the engine was eventually moved forwards a fraction, but you will note that the weight distribution is such that most of the weight would be behind the front axle line. Picture shows the original Magnette steering rack bolted in place.
FEBRUARY 2005
A rebuilt Toyota Supra 5 speed gearbox purchased ex - Paul Forsyth's MGB 4.6 V8 racer. A bit early maybe but it was required for positioning and fabrication of the gearbox mounting brackets.
MARCH 2005
A pair of Australian Ford Cortina front stub axles were purchased via
the local TradeMe auction
site, but as they made the wheels protrude, several other options were explored -
unsuccessfully as it happens... Many
 converters manage to use MGB or even MGF
components and some use Jaguar, but Mal elected to use the Cortina units as they gave the measurement he wanted and they do appear to be sturdy. However, (much) later on it appears there was a major flaw in the reasoning, but for the time being, at least, they were
deemed fit for the intended purpose.
converters manage to use MGB or even MGF
components and some use Jaguar, but Mal elected to use the Cortina units as they gave the measurement he wanted and they do appear to be sturdy. However, (much) later on it appears there was a major flaw in the reasoning, but for the time being, at least, they were
deemed fit for the intended purpose.
APRIL 2005
Basic engine mounts were fabricated. They are shown before they were strengthened but note the shape of the hole. This facilitates engine refitting, as the engine mountings can be left on the engine. Clever stuff Mal...

MAY 2005 - after one full year

Eventually, it was decided to build most of the suspension from scratch, but these Aussie Cortina stubs were used. Mal trials a borrowed front wheel (15") for position, to keep within the bodywork. A second-hand BMW power steering rack seemed ideal, suggested by the local power steering specialists, Porana Rd - another racer - Pete Sutcliffe... This was a comfortable choice, given the short term relationship that BMW had with MG Rover... At that stage, I thought that power steering may be required so provision was there from the beginning. Once again, much later, this proved to have been a mistake, but as with the hubs, for the time being, work continued on the basis that all the basic thinking was sound. I was quite smug at the thought that the BMW rack with the facility to be powered if required, was smart long term thinking, but getting the rack totally overhauled just added yet more cost.
Although the last picture looks as though a lot of progress had been made, it is only because the bolt on wings hide the fact that not a lot had in fact been done! One year from the day I bought the car and by then, I really thought I should have had a car on its wheels, engine installed and ready to be finished. Just how wrong can you be? It unfortunately didn't get a lot better...