

MG Magnette V8 - "MON ZA8"
The front suspension and steering geometry still needed more work from Farnie, so the off the shelf track rod ends were ditched and Farnie made up his own, plus a pin for the steering link. Only when the car is on its wheels could some of these items be finalised.
(In fact, the whole geometry was subsequently found to be incorrect so please don't copy anything stated here as workable!)

Meanwhile, disc pads were sourced for the rear (and were not what we expected either!). We were expecting Nissan pads but the pads used were a Holden item... This really is an international car, with a mix of UK, Australian, Japanese, French and Dutch items at the rear alone, with a bit of Kiwi and South African thrown in for good measure.

The handbrake works and the next stage was to get the car onto its wheels and the outcome of the court case would obviously have a major bearing on that timescale.
March 7th 2007 - THE court case...
An amicable resolution at court, whereby the parties concerned finally agreed that the damage to the 3 wheels, (manufactured in Australia) was probably caused before the wheels were received by Performance Wheels in NZ. They offered to get them professionally repaired at their cost, and offered me the opportunity to purchase the (4) additional wheels I required, at a favourable rate, which I accepted.
 Over at By'Gone, Mal had the engine back from those nice chaps at Glendene
Engine Reconditoners and was putting it
together. Unfortunately I wasn't present when he started so the
photographs show a semi completed engine! We knew some time ago that
the engine had a couple of bent pushrods, as they kept falling out and when I asked why that would have
happened, Mal simply stated that the fitted valve springs were only rated at
20lbs, so he has fitted 80lb springs. (His own V8 runs 150lb springs...)
It was left to me to source a couple of replacement rods... Needless
to say, I had to purchase a full set, and the length wasn't exactly the same as
the old ones, just three thou shorter.
Over at By'Gone, Mal had the engine back from those nice chaps at Glendene
Engine Reconditoners and was putting it
together. Unfortunately I wasn't present when he started so the
photographs show a semi completed engine! We knew some time ago that
the engine had a couple of bent pushrods, as they kept falling out and when I asked why that would have
happened, Mal simply stated that the fitted valve springs were only rated at
20lbs, so he has fitted 80lb springs. (His own V8 runs 150lb springs...)
It was left to me to source a couple of replacement rods... Needless
to say, I had to purchase a full set, and the length wasn't exactly the same as
the old ones, just three thou shorter.
Things were moving so well that I needed to lean on "Sir Reginald
Whitworth-Socket" who was checking over the original SU carbs, replacing any
obviously worn parts. The decision had been made to get the car running
first, before lavishing extra dollars on trying to get it to go faster, and the
cost of totally reconditioning the carbs was not therefore justified.
Perhaps as well, as it cost enough as it was, just for the overhaul kits and the
labour. One could never accuse Sir Reggie of being cheap. I had
already polished the dashpots but they didn't look as nice as a fully reconditioned set, but the intention was to fit a better set up once the overall car was up and running.
However, I am not one who can just plonk such an i mportant
and obvious piece of the the project looking totally scruffy, so an afternoon
was spent dismantling a couple of bits of the linkage and making them look a bit
better. At the same time, a bit of the red paint was applied to the fins
on the rocker covers, just to brighten the engine a little. Black and
silver is smart, but it does look better with an additional colour, otherwise it
looks a bit drab. My company
mportant
and obvious piece of the the project looking totally scruffy, so an afternoon
was spent dismantling a couple of bits of the linkage and making them look a bit
better. At the same time, a bit of the red paint was applied to the fins
on the rocker covers, just to brighten the engine a little. Black and
silver is smart, but it does look better with an additional colour, otherwise it
looks a bit drab. My company
 colours
have been silver, black and red since 1987, but it was good to see the McLaren
F1 team
adopting them! The various bits were then taken down to By'Gone and
just placed on the engine for the photograph. That oil filler cap in
orange clashed, so it had to go.
colours
have been silver, black and red since 1987, but it was good to see the McLaren
F1 team
adopting them! The various bits were then taken down to By'Gone and
just placed on the engine for the photograph. That oil filler cap in
orange clashed, so it had to go.
This meant that the basic engine was all but complete, so the next stage was to install it into the shell and get the prop shaft made up. Fortunately, the Supra gearbox came with the front end and the original Magnette prop shaft fitting was identical to the MGB, meaning that local transmission specialists ADL, just needed the bits and the measurements that Farnie had given me, to get the shaft made.
I purchased a more modern alternator with built in regulator ready for fitting and wiring up and once the engine was in place, such important details as a radiator, fan, power steering pump and even a heater could be considered and the exhaust system finished.
 I hadn't been totally idle at home. A mould for the sill covers was
constructed, using a melamine coated board as the base. The sides were made up
of various bits of timber, and a bit of filler was required to fill in various
indentations to the timber. Several coats of mould release wax were
applied and polished.
Then just one layer of mat onto a gelcoat was used
to make one very thin sill cover for test purposes only. Oh dear... The filler
all came out... The filler always seems to be attacked through the wax, so I
need to make a better job of the mould before doing any more, using a better
filler and also using a PVA barrier. I had designed the mould in a such a way that one mould would do
the right and left sill covers, with just a little bit of fiddling. The original
sills were too far gone to use and the advantage of fibreglass for me, is that I
can do it at home, though I am sure that getting a local metalwork shop to make
them, would be quicker. In fact, I rather think that stainless sill covers
might look OK, especially if deepened a bit, to give the impression of a lower
ride. We'll just have to see how things pan out.
I hadn't been totally idle at home. A mould for the sill covers was
constructed, using a melamine coated board as the base. The sides were made up
of various bits of timber, and a bit of filler was required to fill in various
indentations to the timber. Several coats of mould release wax were
applied and polished.
Then just one layer of mat onto a gelcoat was used
to make one very thin sill cover for test purposes only. Oh dear... The filler
all came out... The filler always seems to be attacked through the wax, so I
need to make a better job of the mould before doing any more, using a better
filler and also using a PVA barrier. I had designed the mould in a such a way that one mould would do
the right and left sill covers, with just a little bit of fiddling. The original
sills were too far gone to use and the advantage of fibreglass for me, is that I
can do it at home, though I am sure that getting a local metalwork shop to make
them, would be quicker. In fact, I rather think that stainless sill covers
might look OK, especially if deepened a bit, to give the impression of a lower
ride. We'll just have to see how things pan out.
The 4 new wheels (15x6) from Performance
 arrived
and they were taken down to Farnie for checking. As the brakes were
all fitted up with pads etc, clearances could be confirmed. Fit was tight
of course, but the front calliper needed a little bit of easing as the top front
corner almost touched the wheel. This was a two minute job with a Surform
on the alloy callipers.
arrived
and they were taken down to Farnie for checking. As the brakes were
all fitted up with pads etc, clearances could be confirmed. Fit was tight
of course, but the front calliper needed a little bit of easing as the top front
corner almost touched the wheel. This was a two minute job with a Surform
on the alloy callipers.
After misplacing the gasket for the fuel tank sender, I finally found it and
put a temporary wire on so that I knew which was the low fuel level light and
which was for the fuel gauge. The sender unit just needed the float length
setting with a couple of dabs of solder and that was another small job crossed
off the list. I had advertised the tatty old Magnette
 seats,
just in case someone wanted them as patterns but with no takers, they were ready
for the scrap heap. I am an inveterate dismantler and before I throw
anything out, I like to take it apart first, both to salvage any parts and also
to try and glean information as to how it was assembled. Just stripping
the seats was enough to appreciate the amount of work that used to go into a
saloon car of the fifties. So many panels to be cut out and stitched, plus
frames, springs, wadding, horse-hair, timber, foam, leather, vinyl, armrests
etc. To replicate even the rear seats back to original, would be
seats,
just in case someone wanted them as patterns but with no takers, they were ready
for the scrap heap. I am an inveterate dismantler and before I throw
anything out, I like to take it apart first, both to salvage any parts and also
to try and glean information as to how it was assembled. Just stripping
the seats was enough to appreciate the amount of work that used to go into a
saloon car of the fifties. So many panels to be cut out and stitched, plus
frames, springs, wadding, horse-hair, timber, foam, leather, vinyl, armrests
etc. To replicate even the rear seats back to original, would be
 extremely
expensive, and further explains why to restore a car of this type is
prohibitively expensive. The workmanship and materials would be no
different from a Jaguar saloon, but the selling price of a restored Mark 2
Jaguar against a Magnette would be vastly different. I decided that
it might be a nice touch to incorporate a central arm rest, so I rescued the
original mechanism, but adopted a more simplistic and lighter methodology.
The original, fully upholstered rear seat back weighed about 15kg... By
doing away with the metal springs and also a metal blanking plate over the
aperture, and just slotting the mechanism through the back, a fair bit of weight
was be saved. The arm would only be lightly upholstered as it was more for
looks than function, though setting in sockets for a set of headphones wouldn't
be difficult... Maybe next time.
extremely
expensive, and further explains why to restore a car of this type is
prohibitively expensive. The workmanship and materials would be no
different from a Jaguar saloon, but the selling price of a restored Mark 2
Jaguar against a Magnette would be vastly different. I decided that
it might be a nice touch to incorporate a central arm rest, so I rescued the
original mechanism, but adopted a more simplistic and lighter methodology.
The original, fully upholstered rear seat back weighed about 15kg... By
doing away with the metal springs and also a metal blanking plate over the
aperture, and just slotting the mechanism through the back, a fair bit of weight
was be saved. The arm would only be lightly upholstered as it was more for
looks than function, though setting in sockets for a set of headphones wouldn't
be difficult... Maybe next time.
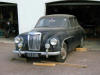
MARCH 28th 2007 ENGINE COLLECTED! - a landmark day
Mal had finished the engine build so as it was the end of the financial year,
the engine was accompanied by a fat bill, with a plea to pay it straightaway.
Given the slow progress and lack of urgency throughout the whole of 2005, the
irony of this
 was
not lost on me... We heaved the engine on to the back of Farnie's ute, and
nipped round the corner to unload it. What I wasn't aware of was that the
engine was now supplied without flywheel, clutch etc as it came from a car with
automatic fitted. But, as it wasn't going to be running for a while
anyway, Farnie agreed to drop the engine into the bodyshell and bolt up the bell
housing and gearbox, so that I could take the whole lot back home for the next
stage, and try and have a couple of months without massive bills. Sourcing a
flywheel and a clutch could wait a while. The following day, the engine
was in, a couple of old spare tyres (of different sizes) added to two of the the
new wheels, and within minutes, the car was sitting on wheels for the
first time in two and a half years! One tyre was a 55 series tyre and the
other a 60 series. Once again, a significant milestone, but the
pressure now very clearly on my shoulders. Farnie insisted we pop the
other front wing onto the car and also the original bonnet, so that we could see
what it looked like, though the temporary original, reversed rear wheels
did look a bit odd... Without the front shroud under the front, we thought
it looked rather cool! However, the plan never was to have a
'stripped' race saloon.
was
not lost on me... We heaved the engine on to the back of Farnie's ute, and
nipped round the corner to unload it. What I wasn't aware of was that the
engine was now supplied without flywheel, clutch etc as it came from a car with
automatic fitted. But, as it wasn't going to be running for a while
anyway, Farnie agreed to drop the engine into the bodyshell and bolt up the bell
housing and gearbox, so that I could take the whole lot back home for the next
stage, and try and have a couple of months without massive bills. Sourcing a
flywheel and a clutch could wait a while. The following day, the engine
was in, a couple of old spare tyres (of different sizes) added to two of the the
new wheels, and within minutes, the car was sitting on wheels for the
first time in two and a half years! One tyre was a 55 series tyre and the
other a 60 series. Once again, a significant milestone, but the
pressure now very clearly on my shoulders. Farnie insisted we pop the
other front wing onto the car and also the original bonnet, so that we could see
what it looked like, though the temporary original, reversed rear wheels
did look a bit odd... Without the front shroud under the front, we thought
it looked rather cool! However, the plan never was to have a
'stripped' race saloon.

I could now do the wiring, interior and work on the replacement body panels, something I probably should have done much earlier and before the base shell had any paint at all put on it, but for a variety of reasons, the sequence never was perfect.