

MG Magnette V8
Christmas away and only a few months before another two long trips was going to take a chunk out of 2012.
Bits and pieces and various loose ends now needed sorting out so what little time I had didn't seem to make too much difference to the overall project. One of the critical areas was getting the front and rear windscreens refitted and this was a job that I was not going to attempt, but until the glass was fitted, I couldn't securely fix the dashboard. The short sprints up and down our quiet street and the wind buffeting meant that there was no way I was going to take it to Hampton Downs race circuit for a bedding-in track run without the glass!
EARLY 2012
Meanwhile the refitted boot lid cleared the hi-stop rear light but some time was spent fettling it to get it to lie flat. Amazing how doing something simple like fitting the brackets somehow or other pulled the lightweight skin a bit out of shape. Sorting out the hinges was then put on the back burner for a while as I wasn't happy with the operation of them and really needed a better cantilever hinge. That a would have to wait. When the hinges were sorted, then I'd fill in the panel again - or French it slightly...

I ordered front and rear screen rubbers from the UK Magnette specialists, Shortens of Norfolk, and these arrived promptly (as stuff always does from them - and before I'd even paid). Trying to get the screen fitter round proved more difficult. When he eventually did make it, he felt that the screen rubbers were incorrect. (Doubtful, as Shorten's only deal with Magnettes...) Anyway, I later worked out how they should work but he had ordered some generic rubber anyway.
I waited eagerly for his return just before we were going away on the Monaco trip, but he got bogged down with a caravan window fit - and then he went away on holiday too... So at the end of May, I hadn't really made much progress.
JUNE 2012
We arrived back and whilst waiting for the screen fitter, I managed to fashion a wooden gear lever knob out of a local native timber - Rimu. This was from a chunk of timber I'd cut off a mantle-shelf! Aftermarket offerings locally were aimed at boy racers and looked terrible anyway, so I went for the simple look. Ironically, getting a nut of the correct thread size wasn't exactly straightforward either! Despite wading through many plastic jars of of new metric nuts and bolts, plus a load of imperial ones, nothing fitted! A trip to "The Bolt Shoppe", returning with with two or three samples, eventually produced a nut with the correct thread.


The hole was drilled then the shape of the nut carefully chiselled out and the nut glued into place using a good PVA glue. Shaping wasn't too difficult and the finished article was dunked in CD-50, an oil used for cedar protection. Past experience suggests that using any kind of varnish or lacquer is eventually going to wear through, whereas an oil will just polish and an extra coat at a later date is easy.
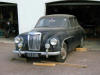
Andy arrived back for another go at the screen. He cut the genuine Magnette front rubber to size and glued the ends but despite several attempts, he wasn't happy with the fit. He seemed to struggle with the way the rubber sat, particularly on the inside corners. He then brought out the off the shelf item he'd ordered and that fitted well and sat so much better. He used the non original chromed plastic filler strip (as used on Minis) rather than the original stainless finishing trim and I was well pleased with the finished look. Only a marque expert would know that it wasn't original.
The rear screen fitted easily and the immediate effect was of a car that was almost road ready apart from the bonnet and boot lids of course... The boot lid is quite large and my intention has always been to mount the number plate behind Perspex and the position of the number plate was a matter of aesthetics as it is a little higher than the original. Whether the number plate is lit from outside or inside has yet to be determined. I rather like the idea of it being lit from the inside.
Whilst dealing with the lighting I wasn't too happy with the left hand rear lamp unit so that was removed. When initially reconditioning, I replaced the wiring right to the lamp holder, which is a slotted, spring loaded piece of Paxolin - which is now quite fragile. The rear light/brake light lamp (bulbs are planted in the garden I am told) itself wasn't a good fit and kept slipping out and losing contact, so it needs a bit of surgery on the holder. To reiterate a comment made earlier, the indicator lamp has been incorporated into the light unit and hazard lights have been incorporated into the wiring system, activated by the steering column switch from the MG Montego column assembly. The photograph below shows the hazard light flashing!


The pictures show one headlight and tail light fully fitted. The hazard flashers were tested and work well, as did the indicators. The headlamp bowls (Mini) needed a small modification to allow the wiring block clearance, then when testing the sidelight circuit, I think that left the lamp holder must have shorted out! The original rubber gaskets between the headlamps and the front wings were long gone, so I cut some out of an old tyre inner tube. (Most tyre fitters are happy to throw that sort of stuff away, so it cost me nothing.)
We had only been back a short time from the Monaco trip, when it
was time for our originally planned trip, so progress was slowed
again. However, the industrial lockstitch sewing machine I'd
acquired from work several years ago, was finally dragged home.
It hadn't been used for years and I just switched it on to see if it
would work. It did, so I organised a mechanic to service it
and set it up. He eventually arrived, bringing with him, three cones
of the suggested thread and a packet of needles. He gave it the once over, filled it with oil
and got it sewing well - eventually. But, I wanted it to sew
vinyl and leather and it struggled, but this was put down to
incorrect needles.

A week or two later after several reminders, the new needles were dropped off, but I still couldn't get it to sew, so he was called back. He decided that the supplied thread was incorrect, so after another delay, new thread arrived. I am still struggling with it but hopefully, you won't really notice.
On my plans were a gear lever gaiter and a replacement of the rear upholstery, as the rear seats are only for show, (fitting a cage renders the rear seats unusable - legally. Illegally, I may still be able to park someone in the seat behind the passenger, for track rides...).
JULY 2012
With the glass in, I decided that it might be a good time to take it to Hampton Downs for a few test laps before carrying on, just in case there was anything that was a problem. Before that could happen, I needed a full wheel alignment as the last thing I wanted was to scrub a set of new tyres and wreck them. So, off down to Wairau Alignment where Caesar worked his usual magic. I suppose I should have published the settings here, but as you read on, you'll realise why I haven't.
A day or two before we left, the local certifier (the car has to be certified because of the modifications) rang to see if I'd do him a favour and lend him the car, as he had to be audited and needed something more substantial than a set of adjustable ride height shock absorbers. This meant the car would be well and truly 'gone over' as the auditor would be breathing down his neck. He called in just to check the state of the car as he hadn't seen it for a few years (yes, years!) and pointed out straightaway that the welded steering column UJ, where the Montego column joined the BMW rack, that cost me $160, was no longer acceptable...
I realised that this could be a (large) double edged sword but agreed anyway. At this point, please note that the certifier was involved in the revised front suspension design so had been aware of the car and its initial progress and had even suggested the use of specific components. My thinking was that although the car wasn't really ready, I may as well get the the bad news over early so that there was time to fix anything whilst I was overseas. He also explained that before he could do the official certification, I had to adhere to a specific sequence.
- Apply for a Motorsport NZ logbook
- Get the cage homologated by MSNZ
- Apply for an Authority Card (from MSNZ) - that allows the use of full harness seat belts on the road
- Get the car certified
- Take the car for compliancing
- Get a Warrant of Fitness (MoT in the UK)
- Pay for the road registration
What happened next was probably the low point of the whole project... Or should that be low points? I was prepared for a degree of bad news (of course), but nothing prepared me for what was to follow. So with four days to go before we went away...