

A bit of a postscript to the previous page before I headed overseas for three months. I really wasn't very happy - particularly at the repair certifiers attitude. I never heard from him again so I had no list of work required and talking to others, he was well known for being difficult. I seriously considered developing it as a track car only, but to do so would have thrown away $$$$$ galore trying to get it legally passed for road use, which was always the intention.
I moped for a couple few days, but as there had been so many setbacks and disappointments, I couldn't give up.
FEBRUARY 2014
Being at a (very) low ebb, I contemplated the next move. Logic dictated that I needed to address the problem of the slightly modified parcel shelf, to at least get the overall modifications signed off. Having spent almost 3 years dealing with that aspect of the red tape alone and feeling confident that it was no more than an oversight and easily remedied, early February, I contacted the LVVTA (modifications) certifier - yet again.
After two or three weeks of nothing and several emails to him, I eventually had a message to take the car down - but it wouldn't start! I was sure there was fuel in the tank, but nothing was coming through to the fuel filter. So a quick dash up to the local petrol station for 10 litres of petrol and into the tank it went. Still no fuel to the filter! This was a new issue. So starting at the front, I pulled off connections or hoses and still nothing, so back to the boot. The pump had been ticking away so I took the outlet pipe off the pump. Nothing.
I then took the pipe off the inlet side of the pump. Nothing. Suspecting a tank blockage of some sort, I blew down the pipe. There was a 'bang' such from a released vacuum and I got a face full of petrol! I quickly reattached the pipe to the pump and all was well... Strange. The only conclusion was that something must have fallen into the tank and found its way to the pick up point. Quite what I had no idea. However, the low fuel level warning light wasn't working but the fuel gauge was.
So after a slight delay, I trailered the car down to the certifier and he duly photographed the parcel shelf and fuel filler. A five minute job.
MARCH 2014
I heard nothing - so I worked on a wiring, lighting and painting overhaul on the trailer instead.
APRIL 2014
I heard nothing
MAY 2014
I heard nothing and was heading overseas end of the month...
Just before we left, I managed a few laps of the race track and the handling was much improved over the previous run. No oil leaks either. However, the car was chronically under-geared - though it certainly sounded good! I didn't do many laps as there appeared to be a fuel starvation issue when exiting the 180 degree sweeper, uphill, on full throttle, which may or may not have been related to the above hiccup. Having survived a few rather erratic laps, calling into the pit lane more than once, just waiting for the fuel to get through I elected to park the car in the garage (we own an apartment at the track...) along with the trailer and took the Marcos for a couple of laps instead.
Whether something had dropped into the tank and was causing an occasional blockage or the fuel pressure was incorrect, would need looking at later. With the cars and trailer tucked up for the winter, I headed home to prepare for our time away but had a chat to Paul about the next stages
Meanwhile, Paul had already been in contact with another repair certifier and started to establish a rapport which augured well.
AUGUST 2014
We arrived back at the very end of August and Paul filled me in. He had been in touch with the modifications certifier and apparently, LVVTA wanted the whole fuel system checking... Quite why the certifier didn't contact me before then, I really don't know, but needless to say, I wasn't exactly impressed.
SEPTEMBER 2014

I trailered the untouched car back up north to Paul's workshop and the modifications certifier returned to check through whole the fuel system on September 2nd as required by LVVTA. (It would have been easier at home before we left, but there we go...)
The repair certifier (who lives fairly close to Paul) also called at the workshop and checked the car over on the hoist for the general condition and any evidence of dodgy repairs over the previous 60 years. His assessment was much more positive and realistic than with the previous character.
He was happy enough overall (phew!) but wasn't happy with the middle sills. They had been repaired with two joins on either side (see pic, joins are just below the door) and the certifier explained that it needed to be a one piece length of steel. He explained that they would have to be cut out and replaced and he'd then re-examine it. He'd return again when outer sills had been welded on (not pop riveted like it was when I bought the car!).
Back on track at last but we decided nothing
would be done until the LVVTA issue was finally put to bed.
Whilst the car was at home, I decided to fix the non-working brake
lights. I thought it would be something quick and easy such as a
fuse, but it wasn't. Then I thought that maybe with all the
dismantling of the dashboard and the wiring connections, that maybe
a faulty join or broken wire was the culprit. That wasn't the
issue either.
It took two afternoon sessions to find the culprit, which didn't have the Joe Lucas name on it and was the newest part of the brake light system. The micro-switch activated by the brake pedal. I removed the switch (easy enough) and checked it on the bench with the trusty multimeter. When closed, all was OK, but when open, there was resistance between the terminals. A squirt of WD 40 as a last resort, down the spring loaded pin, improved the reading enough to give some encouragement, so I continued to work it and added another squirt. Fortunately it did the trick and once reinstalled, the brake lights worked.
The only other issue from the failed compliance check was a loose dashboard which was a straightforward enough fix as I hadn't bolted it in before, I just had the top loosely sitting in place and that ties the whole lot together. However, over the last few years, the constant moving and reinstalling of the dash whilst still connected to the wiring, caused a couple of chips to the edge of the veneer on the centre panel, which would need addressing later. It had been obvious almost from when I got stuck into the dash, that it would need redoing, but in hindsight (a wonderful thing...) I should never have attached the expensive veneer until the whole dash had been constructed and checked, particularly with the number of times it has been in and out.
OCTOBER 2014
It goes without saying that it took another month after the visit to finally get the paperwork. That is all it was as the original modifications plate had no room on it to add details of the modified parcel shelf.
Bear in mind, no work had to be done to get this aspect passed, so 8 months was somewhat difficult to swallow (even taking into account my absence for 3 months) and raised a few questions that would have to be formally addressed, once the car was on the road. A formal complaint to LVVTA would be top of the list but some form of legal action was also to be investigated.
Two weeks after the final OK, when Paul had space, the car was
trailered up to his workshop, to get the sills sorted. This
would include getting outer sills made up locally as the cost of
getting panels from the UK would be prohibitive. The folding
would need to be outsourced as Paul's folder wasn't long enough.
I left the old rust ravaged sills with Paul (along with a fibreglass
 sill cover I'd made) and asked that the new
ones were a slightly different shape to give the car a slightly
lower look, but without altering the ride height, which by then, had
settled down well. The car looked much better than before Paul
had re-jigged the suspension. I have always been a firm believer
that if the cars stance looks right, it probably is right, though
harder springs would be required to tighten up the front for track
work.
sill cover I'd made) and asked that the new
ones were a slightly different shape to give the car a slightly
lower look, but without altering the ride height, which by then, had
settled down well. The car looked much better than before Paul
had re-jigged the suspension. I have always been a firm believer
that if the cars stance looks right, it probably is right, though
harder springs would be required to tighten up the front for track
work.
Meanwhile, I decided to splash out on a new steering wheel. The Montego wheel was a good one from a driving perspective, feeling modern enough and also strong enough, though opinions varied as to the look.
Initially, I thought that a traditional woodrim wheel, light wood, drilled holes in the spokes would suit - until I checked out the prices and availability. The Motolita wheel was the obvious first choice and there was a boss available to fit the 48 spline Montego column. When researching other suppliers, I found a cheaper wheel, but they couldn't supply the boss.
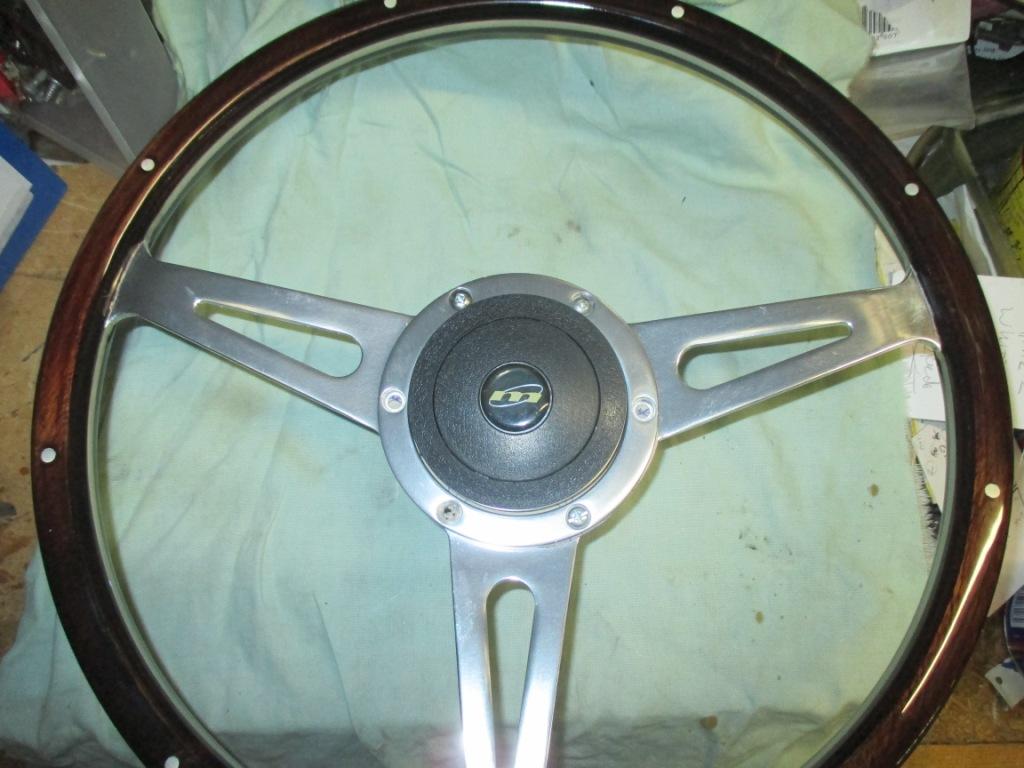
Quite by chance, at the same time as asking on a local message board, I came across a leaflet that had been on my desk for ages, from a NZ company supplying classic mirrors, who has a Magnette and I'd sold him my quarterlights. They were able to not only supply a wheel and boss, but it would be considerably cheaper than getting one from the UK - and a lot quicker. I placed my order on the weekend and transferred my $357NZ to their bank account. It arrived Wednesday morning! However, I ended up with a dark wood Mounteney wheel with slotted spokes, which although not what I had originally envisaged, I was thrilled to bits with it, as the dark wood is a good match for the dash dark wood dash.
The centre cap of black plastic didn't appeal at all and as there was no need for a horn push (it is on the Montego stalk), then my thoughts turned to an alternative. Not having a lathe and metal cutting not being my forte, I managed to make up a thin wooden disc as temporary measure, onto which I would attach an MG logo, probably the one from the Montego wheel. Hopefully Paul would be able to turn up a couple of metal discs. One ring that would give me access to the nut holding the wheel and another that would be easily removable but with an MG badge on it.
I briefly looked at the original Magnette horn push but it wouldn't fit well enough - and needed refurbishing anyway.
Whilst the car was up at Paul's, I tried to catch up with some work at home as once it returned, I would need to put some real effort in, especially to the fibreglassng.
NOVEMBER 2014
One of the jobs on Paul's list was to check out
the fuel tank. I had experienced fuel problems
ever since it woul dn't start when down for the wax injection in
February. The car wouldn't start when going down for the
parcel shelf photographs and again when up at Paul's.
dn't start when down for the wax injection in
February. The car wouldn't start when going down for the
parcel shelf photographs and again when up at Paul's.
Two weeks after delivering the car to Paul, the outside workshop still hadn't folded the metal for the middle sills (more delays...) and Paul needed to move the car. It wouldn't start. He emailed asking if the fuel gauge was accurate as the pump was ticking away and I told him that there was at least 15 litres of fuel in the tank and suggested it might be an opportune time to remove the drain bungs and see if there was anything in there causing these hiccups. The picture tells it all, though where the tape came from, I have no idea. Needless to say, the car then started OK.
Where the tape came from I had no idea nor did I have any idea what it was from. The tape is only about 8mm wide though this pic makes it look wider! We suspect it was a part of the protective film over the stainless steel used when building the tank that got overlooked.
In fact, there was over 30 litres of fuel in the tank but the tank was constructed in such a way that the pick up was in a recess at the bottom of the tank, meaning that it would pick up the very last drop of fuel. Obviously, once the tape fell into that recess, the suction from the pump would easily attract part of the tape and restrict the flow. The other small bits of swarf? Who knows, but possibly from tapping the fuel gauge float?
Towards the end of the month, the folded middle sill panels (a 30 minute job...) were ready and Paul got stuck into cutting off the middle sills. On removal, we noticed that there was no spray wax protection inside at all! This would need further investigation as I thought it had been done back in February. The certifier and Paul had discussed the welding requirements so hopefully, the certifier would be happy, before Paul added the outer sills.
As part of the reconstruction, with a 50/50
weight distribution, Paul welded in a length of vertical roll cage
tube half way along the sill to act as a jacking point so that two
wheels could be lifted at once.
of vertical roll cage
tube half way along the sill to act as a jacking point so that two
wheels could be lifted at once.
The repair certifier was indeed happy with the middle sills so that was one more tick on the progress sheet. Whilst waiting for him to arrive, I suggested Paul use his talents to form a light weight sump guard and we jointly decided that if it was combined with the air scoop to the oil cooler I'd mocked up with fibreglass, it would be so much more professional. When viewed from underneath (car on the hoist) it looks as though it is very dominant, but down at ground level, you hardly notice. Under normal road use, this would be covered by the number plate, which could be easily removed for track work and extra airflow if required.
It may appear that I was at a stage where I was farming out jobs rather than doing them myself, but after ten years, the last three being very frustrating, it got to the point where it was just better to get the job done and pay for it, to speed up the process. In some cases - and this was a classic one, the end result would be better anyway! Every week spent at someone else's workshop was a week that I couldn't do some of the work I needed to do.
Whilst waiting for this to be done, I went back to the company who did the wax injection and they said that they didn't do the sill cavity. Firstly because they knew that work would be required in that area (the original repair certifier was present they when they did it) and secondly, they won't drill access holes. So one of the small jobs to be added was a 20mm access hole for the wand, at each end of the sill cavity.
DECEMBER 2014
Paul offered up the formed outer sills, but found that although they matched the originals, it was if there was a fold or piece missing on the car itself, so they had to be modified. Bear in mind that much of the repair panel work in that area was done 8 years previously and when the car was first received, the outer sills were only attached by pop-rivets. Back to the folder and he couldn't do them exactly as required but did them how he thought Paul wanted them. At least he didn't take another three weeks. Not quite the same so Paul modified them to suit then manufactured the ends and the shaping to suit and drilled for plug welds. The spacing had been agreed with the certifier.
Offered up to the car using wedges to hold them in place whilst on the hoist, it looked pretty good to me and with the end seemingly in sight (yet again...), Paul managed to attach them on the Friday before Christmas, the day the certifier broke up for his annual holidays...
Being the good sort he is, he promised to pop in on the Monday.


Sure enough, the repairs were all passed as OK but before the certificate could be issued, I had to get the sills wax injected and also painted. I could work on the cleaning up (the car was very dusty, thanks to the unmade road to and from Paul's workshop!) and the painting. The wax injection could be done after the Christmas break. Photographs show the roll cage tube welded in as a jacking point. It works well and isn't easily visible when the car is down on its wheels.
Both Paul and I were a bit confused at the shape of the rear door and the fact that it didn't really match the sill, so before painting, a little bit more modification was on the cards. A lesson here for restorers is probably to hang the doors and check the apertures when doing major structural work. As this was never going to be a concours build any way, overall, it wasn't the end of the world. Left and right did seem slightly different but hopefully, like many jobs, only those who have been involved will see any imperfections.


So, 2014 ended on a positive note with every indication that the car would indeed be on the road in 2015. This time, it was more than just hoping but was a realistic expectation.
The final picture shows the car loaded up and on its way home for Christmas. With a busy holiday period repainting the house and race meetings to either work at, photograph or compete in, then progress wasn't going to be too quick anyway.
