

The year 2015 certainly started off with a real sense of optimism. With just a couple of known hurdles remaining, getting the car road legal was the number one priority.
JANUARY 2015
Straight after the Christmas break, the first job was to wash the exterior of the car, as it had certainly acquired a thick layer of dust in the three months it had been at Paul's workshop. Much of the dust was in fact kicked up to and from his premises, set well back from the sealed roads north of Auckland. The interior was also very dusty, but that had to wait.
At least the car started OK every time which was a huge relief after the fuel hiccups of last year. A couple of (illegal) runs around the block to blow the cobwebs out were therapeutic, and the more I drove it, the more I was able to identify minor issues. The first of which was the pedal placement. That would need a bit of work once the car was on the road. I had already mentioned the low gearing and without any sound deadening or carpet, interior noise from the transmission was quite intrusive.
Over the ten years of the project, I must have put on a little width to my own chassis, as the Racetech FIA seats seemed a little too snug - but the body width of the Magnette is quite narrow, so I am not sure that wider race seats would have fitted anyway. If I hadn't elected to use the race seats, I might well have opted for the MG Montego/Maestro/Metro seats - if they fitted.
As soon as the local businesses reopened, I called in to see Dave at Autoblast, to check out getting the sills waxed. A day or so later, I trailered the car round (boy, had that trailer earned its keep...) and Dave managed to spray front and rear, both sides in a matter of minutes, without even taking the car off the trailer. As he'd done the main part of the car in February, he didn't charge me for this extra squirt of wax. That was appreciated.
Back home again and the main job was to paint the sills. I painted any bare metal with a rust converter, then sprayed the welded areas with zinc and added some sealer to any raw edges. The first attempts of spraying with a stone chip paint on a test patch, wasn't 100% successful, so I tried a thin coat of primer first. Much better. The underside was done easily enough then it was time to do the visible areas, partially obscured by the doors.
Before this was finished, I also restarted on the bonnet. The right side wasn't too bad, but I wasn't too happy with the fit of the left side, so once again it was time for the fibreglass, grinding, filling and sanding. Even smallish areas seemed to take a lot of time and effort. Maybe I should have farmed that out too...
I decided I'd let the repair certifier enjoy his holiday break before calling him in again for the final inspection. Meanwhile, it was a state of chaos at home having the roof replaced then the flat areas waterproofed before the peaked areas could be finished.
FEBRUARY 2015
After a bone dry January and the roof still not finished, at the beginning of February I contacted the repair certifier who still had to re-inspect the car to confirm the wax injection had been done and sills painted. I hadn't quite finished the sills, but he was off overseas for a few days anyway, so I had time to get them done. With a load of extra work on the house to do, that had to take priority.
The number of jobs still to be done was still quite long but most were cosmetic but the need to get the fibreglass panels finished and up to paint standard was visually the most important as the car looked so incomplete. I also investigated what I'd do with the fibreglass bumpers and decided that maybe the modern technique of 'wrapping' would be worth investigation. I asked one of our regular race competitors who ran a signage and wrapping company for a bit of guidance and as I expected, a chrome wrap was available. I didn't want to use the original heavy metal bumpers at the front as I wanted a split bumper look and the rear profile had been changed with the fibreglass copy, to cover the tow-bar. Cosmetic, but probably the only aspect of Andrew de Berne's inspirational V8 MG car that jarred. With my bodyshell being silver, silver painted bumpers would look wrong.
STOP PRESS! FEBRUARY 26th 2015 CAR LEGALLY ON THE ROAD AT LAST!!!!
Extensive house renovations over the early part of 2015 kept me too busy to get the car finished - which knowing me, would not be a quick job anyway, but just being able to drive the car on the road legally was a huge step forward and time to identify a few areas I wasn't really happy with.
Apart from a little bit of bare metal on the insides of the rear of the sills, which I'd missed, all was OK. I had to pay another compliance fee of course but the very fact that the car was deemed road legal put me on a high for what was in fact my 69th birthday. A quick call in to the registration agents, a tax disc issued and the new plates (MONZA8) cable tied on at the front, temporarily, and I was on cloud 9 until it had all sunk in.
Road legal? Yes. Finished? Definitely not...
1) The pedals needed realigning and there was nowhere convenient to mount a foot rest for the clutch foot. The pedal length also needed extending and reshaping to suit my 'heel and toe' driving style.
2) A taller dif as mentioned earlier was an urgent item to be dealt with.
3) At slow speed, the steering geometry is such that it felt as though there was too much lock, though having a good turning circle was a positive.
4) Obviously, the fibreglass panels needed finishing. (How many times has that job been mentioned?)
5) The lovingly constructed dashboard got chipped in a couple of places whilst taking it in and out as it caught on a metal bracket, so although the ergonomics worked well enough, all bar one item's location, the previous photographs flattered the true appearance.
6) Two of the doors didn't seem to sit very well and needed work.
7) Whether it was old fuel or something more serious, or the carbs needing to be fine tuned, the exhaust gas was far from clean and a little hazy.
Overall though, not a long list and most items would be remedied over time. Initially, only short journeys were undertaken as teething troubles were expected. One item that caused me a bit of concern was one of the fuse blocks, as occasionally, the car wouldn't turn over and initially, the battery condition gauge wasn't showing a charge, even though the ignition warning light hadn't come on. Waggling the fuses around usually did the trick, but I decided to fit a better quality item anyway as soon as I could.
This saga was obviously far from over as I would try and document progress but as usual, nothing would happen May to mid August, as we were overseas.
AUGUST 2015
 After three months away, with most of the house
renovations completed, a slow re-start on this project. As
noted in 2) above, a taller dif was considered a priority, as the
original MGB dif was way too short for comfortable cruising, with
about 1500rpm on the clock at 50kmh/30mph, compared to the daily Freelander with 1700rpm at 100kph/62mph.
After three months away, with most of the house
renovations completed, a slow re-start on this project. As
noted in 2) above, a taller dif was considered a priority, as the
original MGB dif was way too short for comfortable cruising, with
about 1500rpm on the clock at 50kmh/30mph, compared to the daily Freelander with 1700rpm at 100kph/62mph.
Before I left NZ I ordered through Moss Europe, a 3.07 crown-wheel and pinion, normally fitted to an MGC or MG BV8, which arrived at my brother's house a day later, weighing in at 6kg. As I was unable to claim the 20% VAT back (not allowed on mail order or internet sales), I packed the bits with other 'hard items' such as cables and chargers into a checked-in luggage bag. No problem at Heathrow, but at LA departures, TSA opened the bag, probably suspecting some sort of explosive device. It all came to NZ OK and the next thing was to see if the car would restart, though I did have to replace the battery not long before we'd left. A couple of squirts of ether (Easi Start) and the car fired up OK, so a quick run down to By'Gone Autos, the company who started on the project back in early 2005. I booked it in for the dif work August 20th and once back from that, I was hopeful of getting to grips with all the many finishing jobs still required.


With the taller dif, that 1500rpm dropped to 1200rpm. So far so good. However, taking it easy, it was a case of driving not too far from home as with such a long rebuild, some items had aged before they'd had much use. The brake master cylinder had already been replaced before getting on the road and lo and behold, the clutch slave cylinder also had to be replaced. At the same time, I had a to do list of minor jobs that were beyond my own limited capabilities.
As the car settled down, the tickover was too fast so I opted to take it up to the carb guru, who hadn't seen the car. After a few minutes of fiddling, he expressed some concern with the left carb linkage and return springs, so I trundled back home but the car felt worse! So bad, that I lost all confidence in it. Not good. The lack of use of my left hand meant that most basic mechanical work was an issue, so back onto the trailer and up to Paul Madeley again at Motorsport Fabrications.
On his job list was the carb linkage, a new clutch slave cylinder and a realignment of the foot pedals. However, carb guru didn't seem interested in finishing off the carb adjustment being 'too busy' until after Christmas, meaning a 3 month wait until February. Though he did offer to do a Holley downdraft conversion which he was happy to do quicker. Having already spent thousands more than planned, this offer was declined.
All completed successfully but there was a slight hissing noise from the engine that we didn't take too much notice of initially.
On a local run, there was a small 'pop' and obvious evidence of a water issue from under the bonnet. Luckily, I was local and pulled into a petrol station. A small cap over what was a water bleed tube to the inlet manifold, had rotted out and just split. I gather that this water pipe normally gets plumbed into the radiator. I made it home and effected a temporary repair, but what was a fairly pristine engine compartment had been messed up by the slightly rusty water spray. The temporary repair didn't last and I was unable to source a small bleed nipple with tap, so I opted to simply plug the hole with a 6mm bolt. Not ideal, but it worked.
The erratic running was frustrating so I took it back down to Mal at ByGone. Mal spent about 30 minutes on the carbs and also sorted out the return spring. The car then ran much better and I started to relax a wee bit. Paul's comment had been that maybe it needed a bit less castor on the steering which I totally agree with as at this stage, even with the almost perfect 50/50 weight distribution, it didn't feel as planted as the front heavy Marcos. That probably just goes to show just how well the Marcos handles, even with that cast iron six up front.
Then we had another break as the focus was in fettling the Marcos.
JANUARY 2016
Fettling the Marcos also focussed on water issues, as after 25 years of ownership, it started overheating, but it survived the annual Festival race meeting at Hampton Downs in January, just, where I announced my retirement from racing. The Marcos was tired and it needed a bit of work and I felt that maybe I'd had a good run and would rather retire voluntarily than have it forced upon me. Racing the Magnette? Well, I hadn't ruled out doing the occasional low key MGCC event
APRIL/MAY 2016
 Since the above was written, progress slowed to a
crawl, with other non car projects having to take precedence.
Since the above was written, progress slowed to a
crawl, with other non car projects having to take precedence. 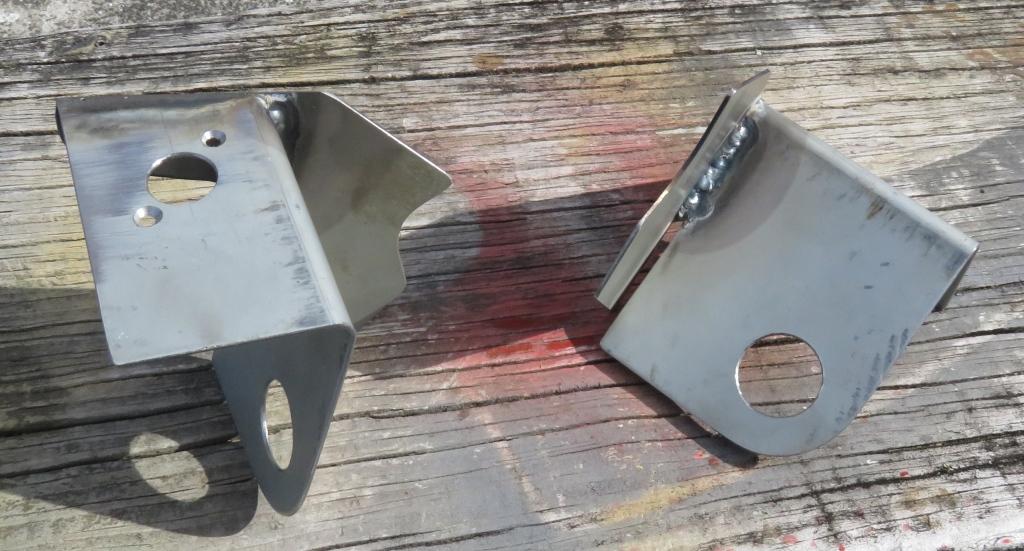
Having got the car running and road legal, the matter of the bonnet was frustrating me as despite many hours working on it, there was something that irked me. I eventually decided that the radiator surround needed to be reshaped and so once again, it was a step or two backwards.

I decided that the front of the bonnet needed cutting back as it looked wrong and that required a rethink and also the Dzus fasteners relocating. Having cut the front off, I made up a template out of cardboard for a new bracket and passed that on to Paul to fabricate. Probably not the best method and once Paul had done them, I had to fettle them to get the fit that I wanted.
Then a tendon transfer operation on my left hand brought things to a total standstill that would probably last until late September, with 3 months overseas yet again.
In fact, it lasted a lot longer for a variety of reasons.
FEBRUARY 2017
Yes, rather a long time between posts and also a long time between spells of work on the car.
For the local monthly 'Caffeine & Classics' meeting held at Smales Farm (not a farm these days, now a large car park servicing office blocks) I hitched up the trailer complete with Marcos and gingerly made my way down. Only a matter of about 5 Kms, but enough to remind me that the Magnette weighs a lot less than expected and about the same as the Marcos - plus the weight of the trailer. I don't think I'll be towing again in a hurry, certainly not another car, but that was really the first public showing of the still as yet unfinished car.
It attracted a fair bit of attention, as did the Marcos and this pic taken very early in the day proves it with one young enthusiast!


As mentioned previously, a fibreglass 'skin' was taken off the original bumper, split and deepened to cover the towbar which uses the original bumper irons. Still in a rough state, it does work and the hole beneath the tail light, in te bumper, is for a parking sensor. You'll notice that there are no extra indicator lights. The original front side lights are now incorporated into the headlamps (Mini units) and the sidelight lenses coated with Tamiya yellow clear paint for indicators. The car passes the regular WoF/MoT test by using the trafficators as currently, the flasher is running a little fast.
The tail light unit has incorporated the terminals and festoon lamp from a trailer lamp unit, which is a tight squeeze, but it works well.
The boot (trunk) lid is also based on a skin from the original panel and has been subtly reshaped to move the number plate but that also needs a fair bit of work. The recessed number plate and LED lights work well. I have tried using a modified latching system based on a Riley Elf, but so far, without much success.